
If you deliberately or accidentally change an Acer Aspire V5-471 (probably other Acers as well) boot setting from UEFI to BIOS, then you may be in for a shock when you try to start the laptop.
 You may get the message Operating System Not Found on the top left corner of your screen or something similar.
Ideally you can press F2 during booting and get into booting settings and change them but in my case F2 does not work! Nothing works - neither a bootable DVD, bootable USB drive or whatever else you throw at it to try to get the machine to wake from coma.
You could spend a year searching various forums. You will learn very little. Some will call you dumb for messing up your BIOS settings.
The answer came from a very smart guy from Nakuru, Kenya called Weru (it means Savannah as in Savannah Institute for Business and Informatics). Open the machine's casing. Pull out the motherboard. Remove the BIOS button battery.
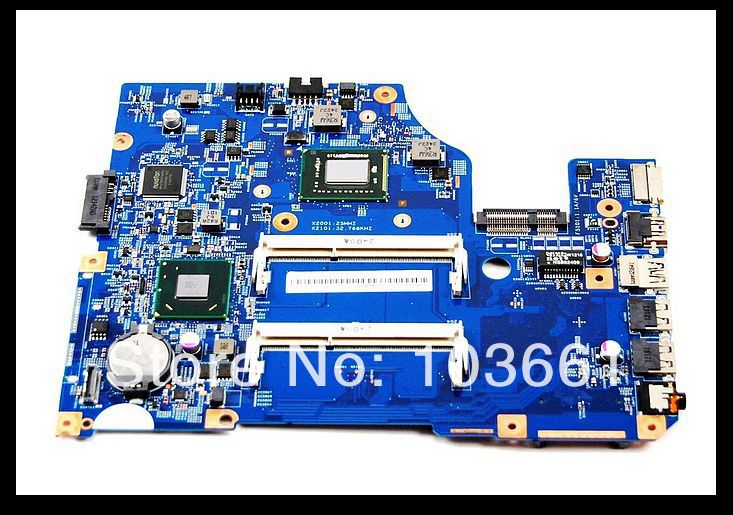
In the laptop motherboard above, the battery in the round whitish object on the lower left corner. After removing it, keep it off for a minute or two to allow any residual charge to drain from the memory that holds BIOS settings (now called UEFI).
Check Youtube videos on how to remove the motherboard and battery. Replace everything and start the machine. You may have to go through a recovery process which is automated on modern laptops and operating systems.
If you don't have the skills or tools to do the job, ask a skilled friend or computer technician to help.
Can you say "Shibboleth"?
The Messiah is coming back soon. Don't forget to prepare!!.
Best wishes.
Ideally you can press F2 during booting and get into booting settings and change them but in my case F2 does not work! Nothing works - neither a bootable DVD, bootable USB drive or whatever else you throw at it to try to get the machine to wake from coma.
You could spend a year searching various forums. You will learn very little. Some will call you dumb for messing up your BIOS settings.
The answer came from a very smart guy from Nakuru, Kenya called Weru (it means Savannah as in Savannah Institute for Business and Informatics). Open the machine's casing. Pull out the motherboard. Remove the BIOS button battery.
In the laptop motherboard above, the battery in the round whitish object on the lower left corner. After removing it, keep it off for a minute or two to allow any residual charge to drain from the memory that holds BIOS settings (now called UEFI).
Check Youtube videos on how to remove the motherboard and battery. Replace everything and start the machine. You may have to go through a recovery process which is automated on modern laptops and operating systems.
If you don't have the skills or tools to do the job, ask a skilled friend or computer technician to help.
Can you say "Shibboleth"?
The Messiah is coming back soon. Don't forget to prepare!!.
Best wishes.
Comments
Post a Comment